Change the Inventory Code with this utility and have it affect all Purchase and Sales History
![]() Change Inventory Code(s) in one of 2 ways:
Change Inventory Code(s) in one of 2 ways:

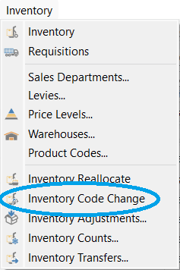
- Inventory Text Menu for one item at a time
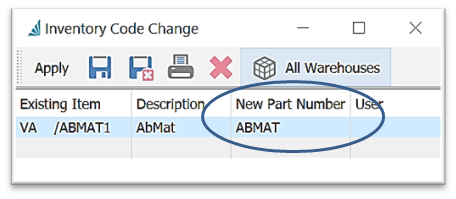
- enter or browse for the Existing Item(s) you wish to change the code for
- enter the New Part Number
- identify whether you want this change to affect this item in All Warehouses or not (provided Multiple warehouses is active)

- option to continue to add items in this worksheet before clicking Apply
 Save or
  Save and Close to access and Apply later
- click Apply to complete the process
 Print the Inventory Code Change List if need be
- Import Inventory Code Change for changing a list of items at once
-
 Export Inventory list in Excel or CSV format - see Export
- create a new column for the new Codes
 click on Open Config if you are accessing settings for a previously saved import configuration, or continue as follows:
- select the file Source location using the Browse Files… if this is an unsaved Import
 or Browse Folders… button if this is a previously saved Import, to load the .xlsx or .csv file Excel spreadsheet created from scratch or amended from an inventory export
 - select the Import Type - Inventory Code Change
- under the Import File Field Value from your Excel spreadsheet, select the first field you want to map - ie: ‘Warehouse’
- under Spire Field Name select the Spire field that matches the one just selected under File Field Name, ie: Warehouse / Warehouse
- click on Match and those two field names will drop to the bottom mapped section
- continue to map the fields you would like to populate the Inventory Transfer utility for this transfer
- select the Destination folder (where successful import will be moved to)
- select the Failure folder (where failed import will be moved to)
- select
 Has Header Row (at top)
 - click on Save config to save the Source, Import Type, and Destination and Failure folders into the current user’s documents folder
- click on
 Save config /
  Save config as to save the Source, Import Type, Field Mapping, Destination and Failure folders into the current user’s documents folder
  click on Import
- open worksheet - Inventory Text Menu > Inventory Code Change, make any necessary changes
- click Apply to complete the process
.png?height=120&name=Gemini-Logic-Logo%20(1).png)