Accessing and generating Inventory reports for Print / Preview / Email

- Access
- Inventory List
- select or multi-select the record(s) from the filtered or unfiltered list (see Filters)
 choose Print Selected or Print All
- Inventory List
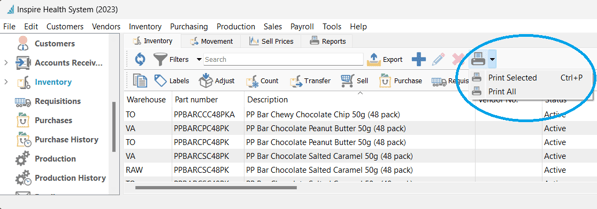
-
- Inventory Reports Tab
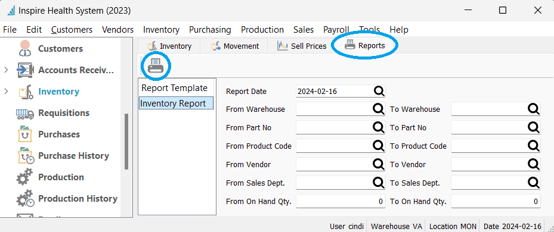
-
- Inventory Details

- Generating Reports / Forms
- from the Spire Reports list,
 select the report(s)/ Form(s) you wish to run
 - highlight the report to check the description below to see if it's what you expect

- from the Spire Reports list,
-
- select the run method:
-
-
- Print
- accept or change the Printer
- accept or change the Paper Source
- printer format permitted, select from Duplex options
- accept or change the number of Copies
- option to Save Defaults so same settings will be used next time this report is selected for printing
- Print
-
-
-
-
- Setup
-
-
-
-
-
-
- establish Company Settings - see Company Settings - Email
- establish User Settings - see User Settings
- Recipients
-
-
-
-
-
-
-
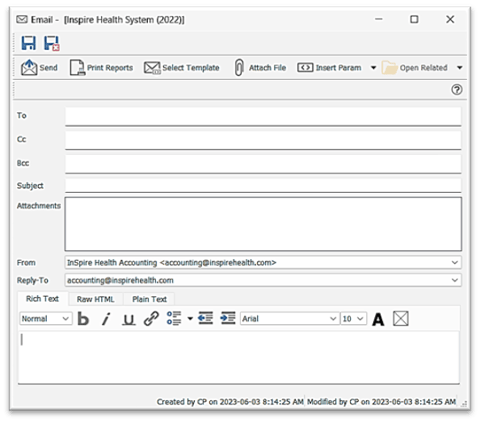
- enter email address(es) in the To box (separate additional email addresses with ‘;’)
- accept or change the CC and BCC recipient(s) default as set in User / Company settings
- Attachments box displays any reports being sent
- select from available email addresses for the From and Reply-To fields
- enter the message in the bottom box
- option to
 Print Reports already attached in this email
 - option to
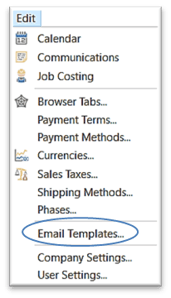
 Select Template or setup a new one:
- Edit > Email templates
-
-
-
-
-
-
-
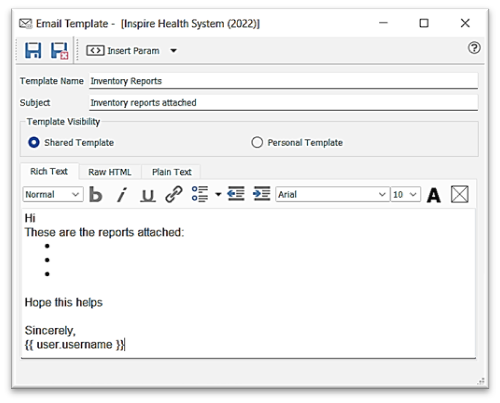
 New template
-
-
-
-
-
-
-
- enter Template Name
- enter Subject for the email
- enter the email message in the Body section, in the Rich Text tab if you want to use formatting (bullets, etc), or the Raw HTML tab if you want to add special formatting or insert an image, or the Plain Text tab if you want to avoid any formatting

- option to
 Insert Param merge field(s) into the subject or message body (username is inserted here)
-
-
-
-
-
-
-
- option to make this a
 Shared Template so no other user can see it, or a
  Personal Template
- option to make this a
- if not using a template, then manually enter Subject and Message, selecting either the Rich Text, Raw HTML, or Plain Text tab
- accept or change the From email address
 Attach File of any type
 Insert Param merge field(s) from the company or user fields into the subject or message body
 Send the email or
  Save /
  Save Close to Edit / Send later from the
  Email module
-
- Preview - see report(s) on screen with additional options (if multiple reports were selected, each report will populate a separate tab) with additional options:

- use Ctrl + scroll to zoom in or out
-
 Print the report currently in the viewer window
 -
 Print All reports if multiple reports were chosen (shown by multiple tabs)
 -
 Export
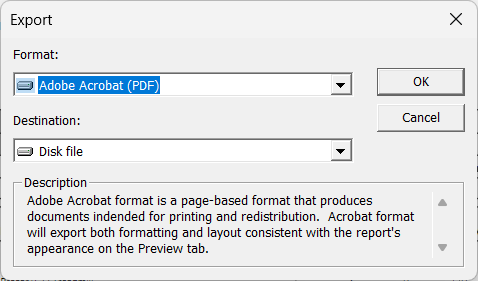
- select the Format
- select the Destination
- Application will open the program on your computer that is associated with the Format you chose
- Disk file will prompt you to save the Report in the Format you chose
- Exchange Folder allows the Report to be accessed through a Microsoft Exchange client such as Microsoft Outlook
- click OK
 Find to search text of the document / report
 navigate through pages of the displayed report, alternatively to scrolling down
-
-
- Security on Reports / Forms can be established at Company Level, User Level or Server Level:
- Company Level - Edit > Company Settings > Reports > Security tab

- Disable Security gives full access to all users for all reports to Preview / Print / Export / Email unless Security is Enabled in User Settings (described below)
- Enable Security gives ability to select which reports can be accessed for all Users to Preview / Print / Export / Email
- User Level - Edit > User Settings > Reports

- Company Default uses settings established in Edit > Company Settings > Reports
- Disable Security gives access to all reports within the modules this User has access to
- Enable Security opens up the checkmarks below Preview / Print / Export / Email to remove access
-
 Use Defaults establishes settings same as Company settings, with the ability to make changes
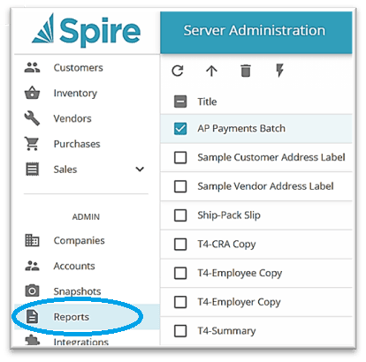
- Server Level - Tools > Server Administration

- Company Level - Edit > Company Settings > Reports > Security tab
-
-
 select a report in the list
  delete or
  disable
-
- Available Inventory Reports
|
Report Name |
Location |
|
Communication Notes |
Inventory Item > Communication tab |
|
Components Usage |
Inventory List / Inventory Details |
|
Historical Inventory Status |
Inventory List > Reports Tab |
|
Inventory Bar Code Label |
Inventory List |
|
Inventory Code Change List |
Inventory Code Change |
|
Inventory Count Sheet |
Inventory Count / Inventory Count List |
|
Inventory Count Sheet by Location |
Inventory Count / Inventory Count List |
|
Inventory Count Review |
Inventory Count / Inventory Count List |
|
Inventory Count Post |
Inventory Count / Inventory Count Post |
|
Inventory Label 2x1 |
Inventory List |
|
Inventory Label 5160 |
Inventory List |
|
Inventory Packing Slip |
Inventory Transfer |
|
Inventory Pick Ticket |
Inventory Transfer |
|
Inventory Movement by Posted Date |
Inventory List > Movement Tab |
|
Inventory Movement by Source Date |
Inventory List > Movement Tab |
|
Inventory Sales History |
Inventory Details > Sales History Tab |
|
Inventory Sales History Details |
Inventory Item > Sales History Tab |
|
Inventory Re-Order |
Inventory List |
|
Inventory Statistics |
Inventory List |
|
Inventory Status |
Inventory List |
|
Inventory Status with UDF fields |
Inventory List (needs to be added) |
|
Inventory Transfer |
Inventory Transfer |
|
Invoice Posted (Re-print) |
Inventory Details > Sales History Tab |
|
Items Allocations |
Inventory List / Inventory Details |
|
Item Components |
Inventory Item > Components Tab |
|
Open Purchase Order |
Inventory Details > Purchasing Tab > History Tab |
|
Pending Inventory Adjustments |
Inventory Adjustments List |
|
Pending Purchase Order Receipts |
Inventory Item > Purchasing Tab > Orders List |
|
Post Inventory Adjustments |
Inventory Adjustment Post / Inventory Adjustments List |
|
Purchase History |
Inventory Item > Purchasing Tab > History |
|
Purchase Order List Detailed |
Inventory Item > Purchasing Tab > History |
|
Purchase Order List Summary |
Inventory Item > Purchasing Tab > History |
|
Purchase Order Reprint |
Inventory Item > Purchasing Tab > History |
|
Purchase Order Reprint |
Inventory Item > Receipts Tab > View PO |
|
Requisition List |
Inventory List > Requisition Details |
|
Shipping Label |
Inventory List – Labels icon |
|
Transfer Packing Slip |
Inventory Transfer / Inventory Transfer List |
.png?height=120&name=Gemini-Logic-Logo%20(1).png)