Transfer Inventory Quantities from one Warehouse to another Warehouse
![]() Transfer in one of 2 ways:
Transfer in one of 2 ways:
- Warehouse Transfer through Inventory
-
- access
- Inventory List

- Inventory Text Menu
-
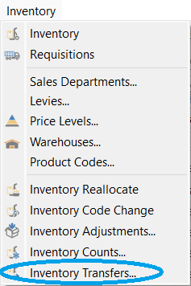
-
- select or multi-select inventory item(s) from the filtered or unfiltered Inventory list (see Inventory - Access / List Functionality)
- click on
 Transfer or from the Transfers list, select
  Add
Add 
- enter Reference No of your choice
- enter the Date this Transfer will be posted
- system auto-generates a Transfer No and Transaction No once you click on
 Post
Post - Source - enter the Warehouse that this (these) item(s) is(are) going to be transferred from
- Destination - enter the Warehouse that this (these) item(s) is(are) going to be transferred to
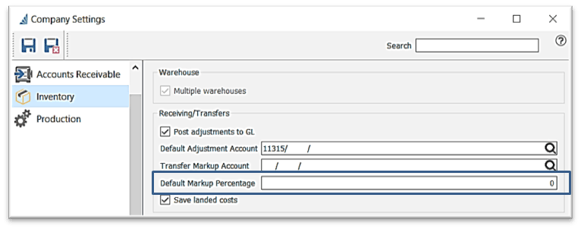
- option to enter a Default Markup % if cost is to be higher in the Destination Warehouse
- this percentage can be set in Edit > Company Settings > Default Markup Percentage and will be captured in the GL Account established in Edit > Company Settings > Inventory > Transfer Markup Account
-
-
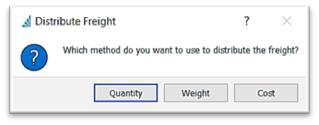
- enter Freight charges incurred by this transfer to add to the cost, with a prompt to choose how it is distributed:
-
-
-
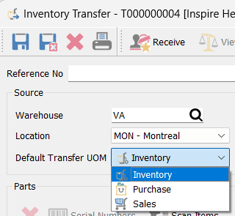
- select the Default Transfer UOM (Unit of Measure) you wish to transfer the items in
-
-
-
- enter the Receive Qty you wish to transfer
- if item is Serialized or Lot Numbered, a prompt will come up to assign Serial / Lot number(s)
- accept or change unit Cost (User settings permitting)
- accept or change Sell 01 default selling price
- accept or change Location
- accept or change Pack Size
- accept or change the Transfer % which is reading from the Default Markup % in the header
 Delete will clear the line selected
 check Serial Numbers that have been assigned to this Transfer
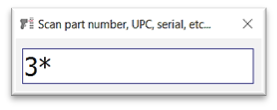
 Scan the Part / Serial / Lot Number barcode to input Inventory item
- use * as quantity multiplier - into the scan box, enter quantity then *, then scan barcode
-
-
-
-
- keyboard shortcut - ctrl+space
 Save /
  Save Close - items will be identified as on order in inventory (Committed), and can be later edited / posted through Inventory Text Menu > Inventory Adjustments
 Receive will update the quantity on hand and post entry to the General Ledger (Company settings permitting)
- Once posted, the Transfer can be viewed through the Inventory Text Menu
-
-


- Warehouse Transfer through Import
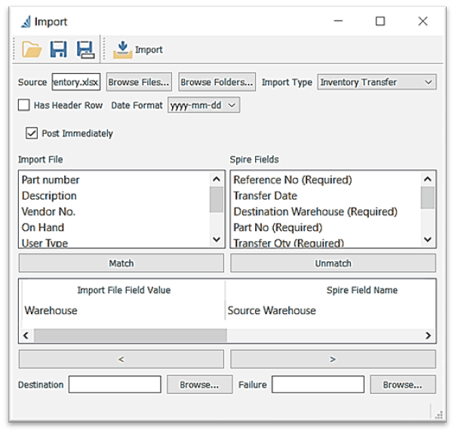
- access - Tools Text Menu > Import
- click on Open Config if you are accessing settings for a previously saved import configuration, or continue as follows:
-
- select the file Source location using the Browse Files… if this is an unsaved Import or Browse Folders… button if this is a previously saved Import, to load the .xlsx or .csv file spreadsheet you are importing from
- select the Import Type - Inventory Transfer
- under the Import File Field Value from your Excel spreadsheet, select the first field you want to map
- under Spire Field Name select the Spire field that matches the one just selected under File Field Name, ie: Warehouse / Warehouse
- click on Match and those two field names will drop to the bottom mapped section
- continue to map the fields you would like to populate the Inventory Transfer utility
- select the Destination folder (where successful import will be moved)
- select the Failure folder (where failed import will be moved)
- determine whether or not your spreadsheet Has Header Row (see top)
- click on
 Save config /
  Save config as to save the Source, Import Type, Field Mapping, Destination and Failure folders into the current user’s documents folder
 - Post Immediately or leave box unchecked to access the Transfer after import to make any changes and Post after
- click on
 Import
 - access the imported transfer in the Inventory Text Menu > Inventory Adjustment to make any changes as outlined in 1. and 2.

.png?height=120&name=Gemini-Logic-Logo%20(1).png)