Accessing and generating Purchase Order reports / forms for Print / Preview / Email
- Access
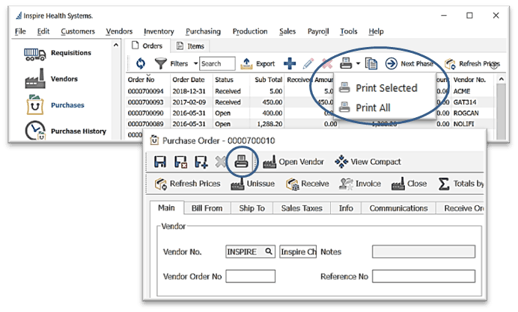
- Purchase Orders:
- Purchases List
- select the Purchase Order(s) from the filtered or unfiltered list (see Filters)
 choose Print Selected or Print All for the reports list
- Purchases List
- Purchase Orders:
-
-
- Purchase Order
- click
 Print for the reports list
- click
- Purchase Order
-
-
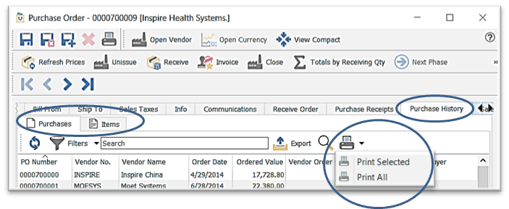
- Purchase History:
- Purchase Order > Purchase History > Purchases / Items Tabs
- Purchase History:
-
-
-
 choose Print Selected or Print All for the reports list
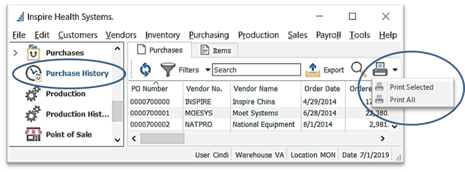
- Purchase History List
-
-
-
-
-
-
 choose Print Selected or Print All for the reports list
-
-
-
- Generating Reports / Forms
- from the Reports list,
 select your report(s)
 - highlight the report to check the description below to see if it's what you expect

- from the Reports list,
-
- select the run method:
-
-
- Print - send directly to the selected printer
- accept or change the Printer
- Print - send directly to the selected printer
-
-
-
-
- accept or change the Paper Source
- printer format permitting, select from Duplex options
- accept or change the number of Copies
- option to Save Defaults so same settings will be used next time this report is selected for printing
- Email
- Setup
- establish Company Settings (see Company Settings)
- establish User Settings (see User Settings)
- select from Email drop-down
- Email Batch – if the email is for multiple records and Saved but not Sent, Spire will create a Batch with all messages contained, accessed in the
 Email module > Batches tab > Messages tab

- open the Batch to view the list of emails with the option to edit / send each message individually or send them all at once
- access them as individual email in the Messages tab
- Email Message – if the email(s) are Saved but not sent, Spire will save them individually, accessed in the
 Email module > Messages tab
- Email Batch – if the email is for multiple records and Saved but not Sent, Spire will create a Batch with all messages contained, accessed in the
- **Note – Emails can be re-sent
- Setup
- Preview - see report(s) on screen with additional options (if multiple reports were selected, each report will populate a separate tab) with additional options:

- use Ctrl + scroll to zoom in or out
-
 Print the report currently in the viewer window
 -
 Print All reports across all tabs
 -
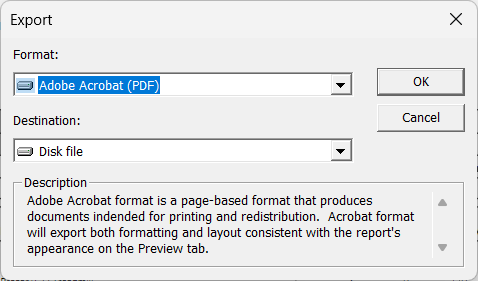
 Export
-
-
-
-
-
-
- select from the listed Formats
- select from the listed Destinations
- Application will open the program on your computer that is associated with the Format you chose
- Disk file will prompt you to save the Report in the Format you chose
- Exchange Folder allows the Report to be accessed through a Microsoft Exchange client such as Microsoft Outlook
- click OK
-
 Find to search text of the document / report
 -
 navigate through pages of the displayed report alternatively to scrolling down
-
-
-
- Security on Reports / Forms can be established at Company Level, User Level, or Server Level:
- Company Level - Edit > Company Settings > Reports > Security tab

- Disable Security gives full access to all users for all reports to Preview / Print / Export / Email unless Security is Enabled in User Settings (described below)
- Enable Security gives ability to select which reports can be accessed for all Users to Preview / Print / Export / Email
- User Level - Edit > User Settings > Reports

- Company Default uses settings established in Edit > Company Settings > Reports
- Disable Security gives access to all reports within the modules this User has access to
- Enable Security gives access to checkmarks for Preview / Print / Export / Email to remove access
-
 Use Defaults establishes settings same as Company default, with the ability to make changes
- Server Level - Tools > Server Administration
- Company Level - Edit > Company Settings > Reports > Security tab
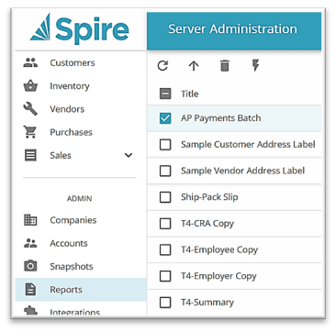
-
-
 select a report in the list
-
 delete or
  disable
-
- Customizations to Forms - most customizations will need to be done by your Spire Partner, but you can perform the following customizations:

- Logo - access in Tools > Server Administration > Companies
 select the relevant Company
 click on Settings
- click on Select Logo then load a maximum 4cm x 4cm image file to print on top left corner of all forms

- Save
- Enter Messages to print on selected form
- access in Edit > Company Settings > Reports > Messages tab
- Logo - access in Tools > Server Administration > Companies

-
-
- select the Report Type
- type the message in the Header and/or Footer text boxes


-
- Available Purchases Reports
|
Report Name |
Location |
|
Accrued Payables Summary |
Purchase Order List |
|
Communication Notes |
Purchase Order > Communication Tab |
|
Customer Sales History |
Purchase Order > Sales History Tab > Invoices Tab |
|
Inventory Sales History |
Purchase Order > Sales History Tab > Invoice Items Tab |
|
Label - Receiving |
Purchase Order Labels Icon |
|
Label - Shipping |
Purchase Order Labels Icon |
|
Label - Inventory |
Purchase Order Labels Icon |
|
Pending Purchase Order Receipt |
Purchases List / Purchase Order Details |
|
Post Inventory Receipts |
Purchase Order Receive Post |
|
Purchase History |
Purchase History List |
|
Purchase Order |
Purchase Order Issue |
|
Purchase Orders List Detailed |
Purchases List |
|
Purchase Orders List Summary |
Purchases List |
|
Purchase Order Reprint |
Purchase Order / Purchase Order List |
|
Purchase Order Summary |
Purchase Order List |
|
Receipts Order Fulfillment |
Purchase Order Receive Post |
|
Requisitions List |
Requisitions List / Purchase Order Requisition Details |
.png?height=120&name=Gemini-Logic-Logo%20(1).png)