Build your Manufactured Items so you can sell them
- Components structure established here can also be accessed in the Production Manager module (if purchased and active) in the Templates tab (see Production Manager - Add New Production Template)
- create your finished (built) item in Inventory, selecting Manufactured Inventory Type

-
 Save
Save - click on the now accessible Bill of Materials tab

-
- add Components by clicking on
 New or clicking into the grid to select the Inventory items
 - accept or change the Description
- identify the Quantity of this component that will be consumed to manufacture one of this Inventory item
- option to enter the Unit Cost on this component if it is a Non-Inventory Item (not setup yet)
- select the Unit of Measure (UOM) that you want to consume this component by
- confirm the Conversion Factor on that UOM
- Inventory Usage will be the same as Quantity unless you are using a UOM that consumes multiples (pack, pallet, etc)
- use the bottom scroll bar to access additional settings to the right
- enter the Lead time it takes to receive / produce this component / sub-component
- accept or change Vendor No that supplies you with this component
- browse for a Category or
 create one on-the-fly from the browse list (also accessed
in the Production text menu) - Categories are used to filter lists and reports for components


- add Components by clicking on
-
- enter the Expected Yield % for the top assembly item, whereby the system will re-calculate the Extended Qty and the Assemble Qty
- enter the Expected Scrap % or Expected Scrap Qty for the components whereby the system will re-calculate the Extended Qty and the Inventory Usage
- insert a
 New item component above the line item selected
  Delete the line item component selected
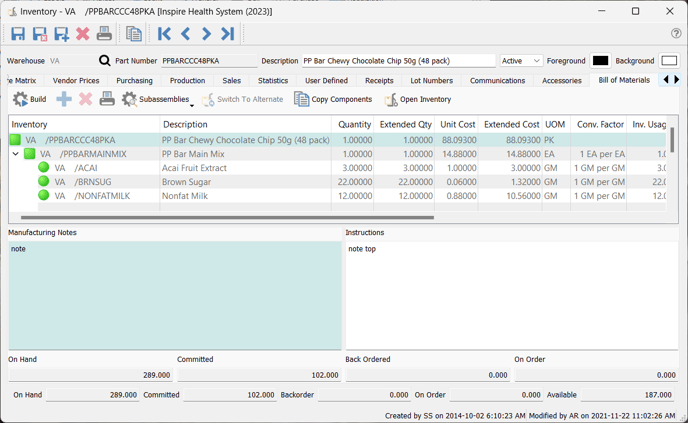
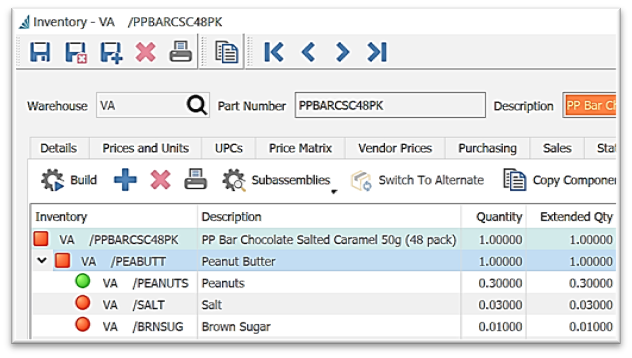
 Subassemblies have a square identifier to the left
- Components View
- Toggle Selected will display the
 Expand chevron for the Subassembly selected
 - ***if the BOM is saved in this state, building it will consume the Subassembly components, not the subassembly (because of this, the Subassembly does not need to be pre-built and in stock)
- Toggle Selected will display the
- Components View

-
-
-
- Expand Unavailable will display the
 Expand chevron for the Subassemblies that have a shortage on stock
- click
 to view their components
- click
- Expand All / Collapse All to display / hide the
 Subassembly components
- click
 to view their components
- click
- Expand Unavailable will display the
 Component identifiers
 Green Square - Subassembly where all components are in stock
 Yellow Square - Subassembly where some components are overcommitted on Sales Orders or other Production Orders
 Orange Square - Subassembly where there is insufficient stock but are on a Production Order waiting to be built
 Red Square - Subassembly where no components are in stock
 Green Circle - Inventory component item in stock
 Yellow Circle - Inventory component item overcommitted on sales orders
 Orange Circle - Inventory component has insufficient stock but is on a Purchase Order waiting to be received
 Red Circle - Inventory component item not in stock
-
-
 Switch to Alternate if the component stock is insufficient and there is an Alternate Part Number assigned in Inventory > Details tab (you can use a UPC code here also)
-

-

 Copy Components will present your list of existing Manufactured Inventory items for you to copy the components from, to insert into a new Manufactured Inventory item
- Manufacturing Notes apply to production of the entire item and will appear in the Production Order

- Instructions apply to the component selected and will also appear in the Production Order
- Component Quantity Information displays for the component selected
- Top Assembly Quantity Information displays for the completed manufactured item
- Component List Column Customization - see Inventory List Column Customization
 Build a Manufactured item (can also be done in Production Orders, if purchased and active - see Production Manager - Templates)
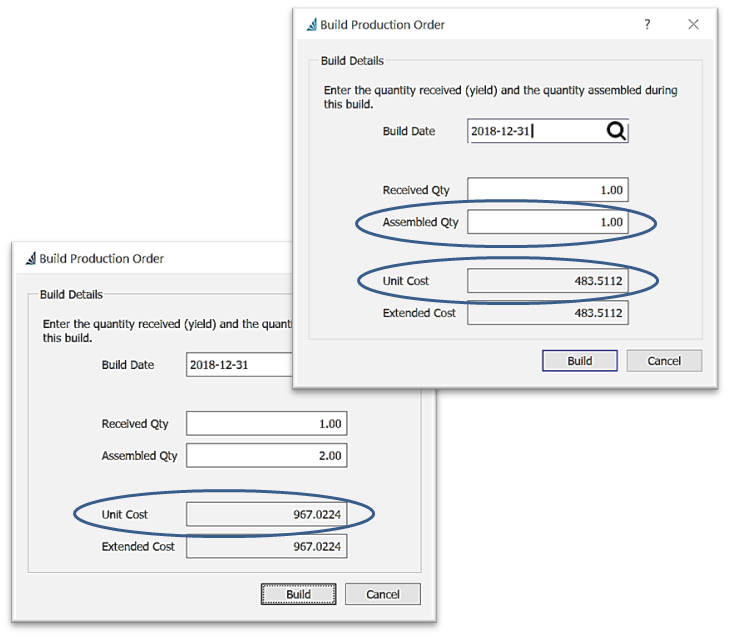
- enter Build Date
- enter Receive Quantity for the number you want to build
- option to enter Assembled Quantity to account for scrap or loss encountered in the manufacturing process and change the actual Unit Cost and Extended Cost
- click on Build to bring stock into finished item and deplete component quantities

.png?height=120&name=Gemini-Logic-Logo%20(1).png)