
Add a new Production Order in one of the following 4 ways:
1. Add Manually:
- from the Production Order List > Orders tab click
 New
New
-
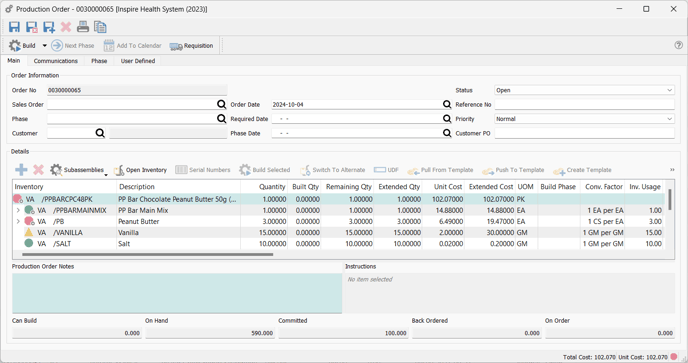
- Order No is displayed, the sequence for which is established in Company Settings > Sequence Numbers > Production Orders tab - Production Order
- option to enter or
 browse for a related Sales Order if this is a Sales Order-specific Production Order (see also Add New Production Order from a Requisition from a Sales Order)
 - Phase can be used in 2 different ways:
- in conjunction with the WIP function (see Production Orders - Build Phase)
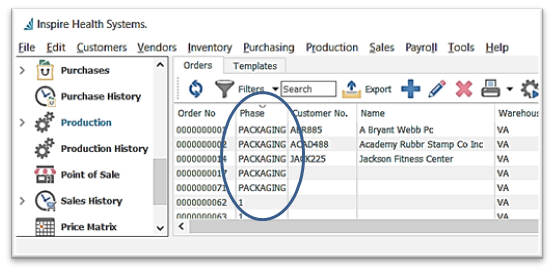
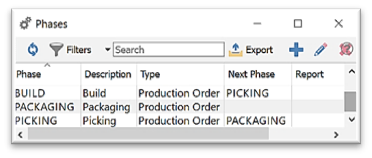
- an optional process monitoring system used to label orders internally, with option to set each Phase to automatically print a pre-determined form(s) and move to a Next Phase, as pre-determined in the Phases setup (also --maintained under Edit > Phases), and option to set default start Phase for new Production Orders, by User (Edit > User Settings > Production Orders > Default Phase)
-
-
- once a phase is established, it will appear in the list, for use in filters and searches
-
-
-
-
 New Phase
-
-
-
-
-
- enter Phase Code
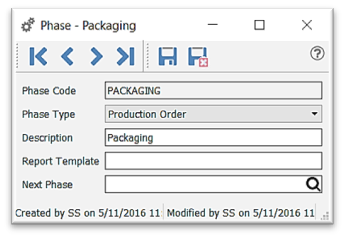
- accept Production Order Phase Type
- enter Description
- options to select a Report Template to be printed when this Phase is assigned (ie: production order)
- identify Report Templates in Edit > Company Settings > Reports > Security tab > Template column:
- enter Phase Code
-
-

-
-
-
- assign the
 Next Phase - for use with the Next Phase function from the Production Order list or from inside the Production Order, to advance to the Phase determined here
- assign the
 Refresh Phases - bring in any new data that may have been entered by another user since you have had this module open or since the last time data has been refreshed
-

 Filter / Search / Customize Phases List - see Production Order List Filters
 - Phases Context Menu - right-click on selected line(s) in the list to display

-
 Export Phases list in Excel or CSV format - see Production Orders Export
 -
 Edit Phase selected.
 -
 Delete Phase selected
-
- option to enter or
 browse for a Phase Date for the Phase assignment
 - option to enter or
 browse for a related Customer for a Customer-specific Production Order (see also Add New Production Order from a Sales Order)
 - accept the Order Date or change by entering or
 browsing
 - enter or
 browse for the Required Date, which is used to determine order times for raw materials
- once the Production Order is changed to ‘Pending’ or ‘In Progress’ status, this date will show as the Due Date in the Inventory Item General tab, Purchasing section
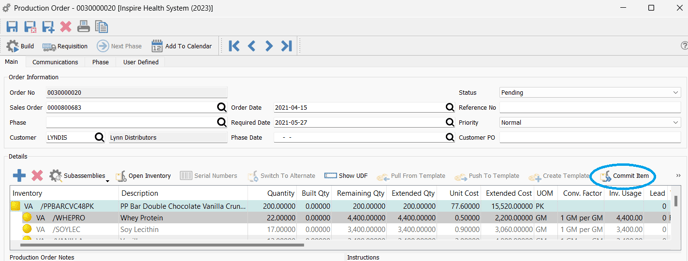
- Status selection
- Open - ready to process, inventory items are not yet committed
- Pending - waiting for go-ahead, inventory items are committed
- In Progress - production has started, inventory items are committed
- note - Pending or In Progress causes product to get committed automatically if this setting is in place:
-

-
-
- if this setting is off (unchecked), you will have the option to manually
 Commit Item(s) selected
- if this setting is off (unchecked), you will have the option to manually
-
-
- option to enter a Ref No of your choice and significance
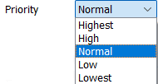
- Priority selection - for filtering, sorting and reporting purposes
-
- enter Customer PO if this is a Customer-specific Production Order (see also Add New Production Order from a Sales Order)
- Production Order Details
- select the Template or Manufactured Inventory item (see also Inventory - Bill of Materials) in one of 4 ways:
-
-
-
- Type into the grid for a list of items to select from

-
 Browse through the Inventory list of Manufactured items, filtered or unfiltered
 - F9 key to bring up a list of Manufactured items
- Templates tab
- Type into the grid for a list of items to select from
-
-
-
-
-
-
- select the desired template for the Manufactured Item loaded (see Template Setup)
- click on
 Create From Template
-
-
-
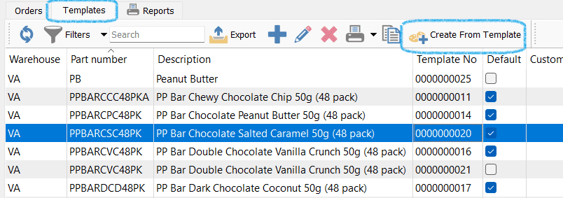
- if there are multiple versions of this Manufactured Item, they may be accessed from the Template column in the Details section

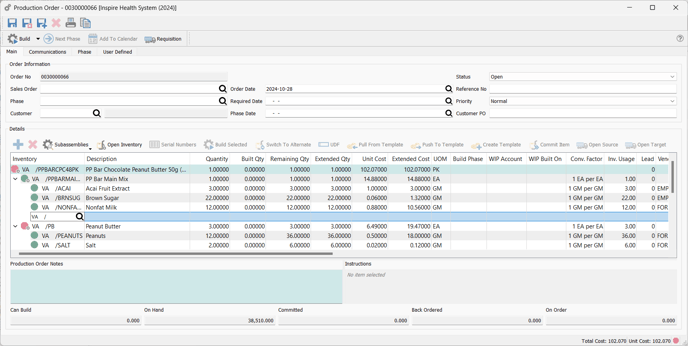
- once the Manufactured item and Template version (if applicable) are selected, the associated components will load into the Production Order items grid:
-
 Insert - inserts a line above the one selected to enter another component part no
 Delete - deletes the line item selected
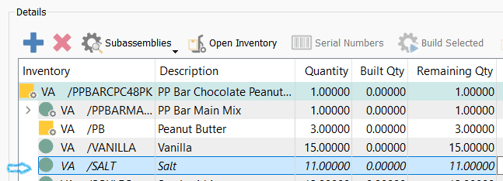
 Subassemblies are identified by a tiny gear in the the bottom right corner of the line item identifier:
-
-
-
- to access Subassembly components select 'Toggle' or 'Expand Unavailable' or 'Expand All' or 'Expand Unavailable' (to Expand only subassemblies with component shortages)

- click on the now visible chevron to view components:

-
 Collapsed - the Subassembly item will be depleted in stock rather than its components if there are any in stock, or if Company Settings allow negative inventory
  Expanded - the Subassembly components will be consumed (depleted)
-
- to access Subassembly components select 'Toggle' or 'Expand Unavailable' or 'Expand All' or 'Expand Unavailable' (to Expand only subassemblies with component shortages)
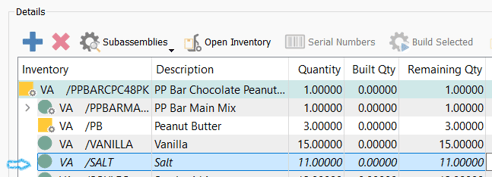
- Component identifiers
 Green Circle - Inventory component has sufficient stock to build this Production Order as well as all other Production Orders with this component
 Yellow Triangle - Inventory component item is in stock but overcommitted on Sale or other Production orders
 Orange Square - Inventory component is over-committed but on order
 Red Octagon - Inventory component item with none in stock
 Green Circle with gear - Subassembly where all components are in stock
 Yellow Triangle with gear - Subassembly where some components are not in stock or are overcommitted on Sale or other Production Orders
 Orange Square with gear - Subassembly where some components are not in stock or are overcommitted on Sale or other Production Orders but are on one or more Production Orders that are in 'In Progress' or 'Pending' status
 Red Octagon with gear - Subassembly where not all components are in stock
- note: Red Octagons indicate that the production order cannot be built unless the Company Setting in Inventory for 'Prohibit over-committing inventory' is disabled:

-
-
-
-
 Open Inventory to view details of the item selected in the grid, with option to view the Production tab for
- Order Items to view other open Production Orders with this item
- History Items to view Built Production Orders with this item
 Serial Numbers - assign serial number(s) to this build for the component item selected
 Switch to Alternate - if this component has been assigned an alternate inventory item, you have the option to select it at this time (see also Inventory - Alternate)
 Show UDF - view / edit the User Defined Fields or data for the line selected (see User Defined Fields)
- data in these fields can also be made visible in the items grid by right-clicking on any of the column headings for the list of available columns and putting a checkmark beside the UDF:
-


-
 Pull From Template if there have been any changes made to the original template and you want to load those changes into this Production Order for all items not yet committed or edited
 Push To Template if you have made changes to the template in this Production Order that you want to save to the original template
- Commit Item - if User Settings > Production > Automatically Commit is off and Production Status is either Pending or In Progress, use this function to manually commit each component if Production Order status is set to ‘Pending’ or ‘In Progress’
 Open Source to view the Sales Order this Production Order was Requisitioned from
- enter the Quantity to be manufactured
- Built Qty displays quantity built if there was previously a partial build on this Production Order
- Remaining Qty displays balance of Quantity less Built Qty
- Extended Qty displays same as Quantity for top assembly item (first line)
- Extended Qty can be changed for any of the components if more were used than anticipated (breakage, leakage, etc)
- Unit Cost for top assembly item (first line) calculates the total of the Unit Cost from all components listed
- Unit Cost for each component represents the Cost identified in Edit > Company Settings:

- where the difference between the cost chosen here (if other than Inventory), and the Average Cost of the component(s) will be captured in the Differential Cost Account established:

- where the difference between the cost chosen here (if other than Inventory), and the Average Cost of the component(s) will be captured in the Differential Cost Account established:
- component cost can be changed in the Production Order, User Settings permitting
- Unit Cost for each component represents the Cost identified in Edit > Company Settings:
- if the item has multiple Units of Measure, you can select which UOM you want on this Production Order (see Inventory Units of Measure)
- scroll to see more columns to the right:
- Conversion Factor displays the conversion of the Unit of Measure used in the Production Template from the Stock Unit of Measure
- Inventory Usage displays component Quantity times Built Qty
- Lead - accept or change the lead time for each component as setup in the Production Template setup
- accept or change Vendor No as established for this Inventory item in Inventory > General Tab > Purchasing section > Primary Vendor
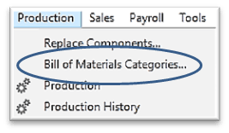
- accept or change Category for each line, using the structure of choice, for filters, sorts and reports
- Categories can be
 Added,
  Edited, or
  Deleted from this list, User access permitting
- Categories can be
-
- also accessed through the Production Orders text menu
- Expected Yield % on the top assembly item (first line), as established in the Production Template setup, can be changed for this Production Order
- Expected Scrap % on each component item, as established in the Production Template setup, can be changed for this Production Order
- Expected Scrap Quantity will calculate based on the Expected Scrap % entered, or you can enter the Expected Scrap Quantity and have the system calculate the Expected Scrap %
- Actual Scrap Quantity can be accepted or changed
- Assemble Quantity for the top assembly item (first line) shows what will be built
- Assembled Quantity for the top assembly item (first line) will factor in the Yield %
- Date defaults to the system date when the Production Order was created or when the particular line component item was added, but can be changed as desired
- Employee can be associated with each line item if desired
- Requisition Type displays where this Production Order originated, if it was created by a Requisition - ie: Inventory or Sale Order (see New Production Order from a Requisition)
- Requisition Number displays the automated number assigned to this Requisition
- Revision displays the code given for the latest change made on this Production Order if this system is active - Company Settings > Production > Enable Revision Levels
- Template displays the Production Template number that this Production Order was created from
 Save or
  Save and Close or
  Save and create New Production Order
- Production Order Details View Column Customization - see Production Order Column Customization
- Production Order Notes/ Instructions (for parent item or component selected) - load from the Inventory details > Bill of Materials tab:
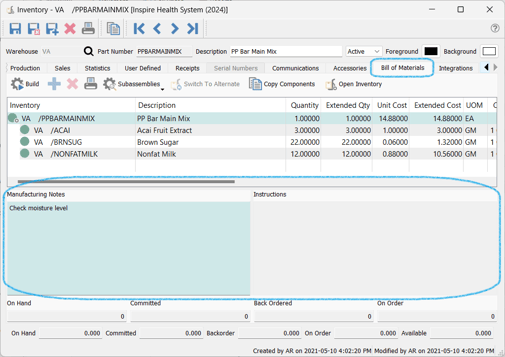
-
- but can be changed here in the Production Order:

- they will print on the Production Order Report (see Production Manager - Reports):

Production Order Footer Displays

- Item Quantity Information
- for the component item selected, a quick view of quantities is available below the grid
- Order Summary Information
- Created / Modified User initials / dates
- Total Cost of the entire Production Order, based on the component Average Costs
- Unit Cost to produce only one, based on the component Average Costs
- Buildability identifier:
 Green Circle - all components are in stock, and order is ready to build
 Yellow Triangle - all components are in stock, but some are overcommitted on Sales Orders or other Production Orders
 Orange Square - Inventory component is over-committed on Sales or other Production Orders but on order
 Red Octagon - some components are not in stock or on order
 Build this new Production Order
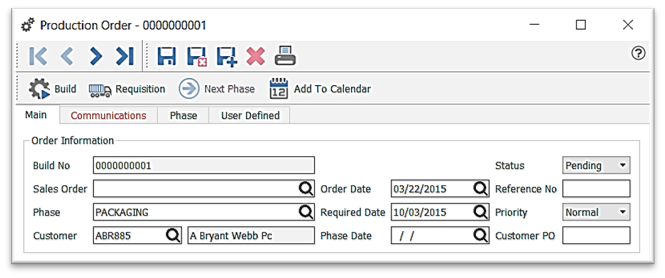
 Requisition any components or sub-assemblies that are short in stock (see Requisition from another Production Order)
 advance this Production Order to the Next Phase (see Production Phases)
 Add To Calendar to schedule a Communication for this Production Order (see Production Communications)
- Note: any changes to the Production Order line items will result in the information becoming italicized:
2. Add a new Production Order by using Copy from an existing Production Order: 
-
- select or multi-select the Production Order(s) your list
- click
 Copy
Copy - the new Production Order(s) will open for opportunity to make any required changes, as described above
 Save or
  Save and Close or
  Save and Create New
3. Add a new Production Order by using Copy from Production History
- access
- Production History module

-
- Inventory details > Production tab > History subtab or History Items subtab

- double-click to open the Production Order in the list, or select the line and click on
 View
View - from the open Production Order, click
 Copy - or -
  Credit
 - a new Production Order will open for opportunity to make any required changes, as described above
 Save or
  Save and Close or
  Save and Create New
4. Add a new Production Order using Requisitions - see Production Order Requisitions
5. Add a new Production Order using Import - see Production Order Import
- Communication tab - see Production Order List Communications
- Phase tab displays information on transition between Phases that have been established for this Production Order (see Phases)
- Phase List Column Customization - see Production Order List Column Customization
- User Defined tab - see User Defined Fields
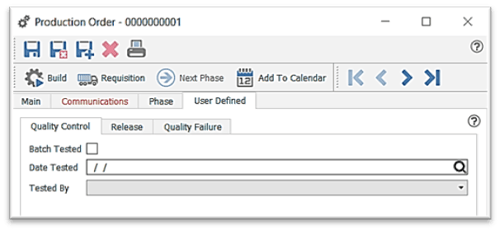
-
- The User Defined Fields (UDF) allows you to add unlimited information fields, for use in list Filters, Excel exports, and for setting into forms and reports
 Edit Production Order
-
- from the Production List window scroll to select the Production Order(s) or use the Search or Filters functions (see Production Order List Filters)
- click
 Edit
Edit - or - double click Production Order line(s) selected
- make necessary changes and note items changed now show in italics:
-
 Save or
  Save and Close or
  Save and Create New
-
 Delete Production Order
- select Production Order(s) from list
- click
 Delete
 Build a Production Order - see PRODUCTION ORDERS - Build