Add a new Purchase Order manually

See also Add a Purchase Order using Copy and Add Purchase Orders using Import
- from the Purchase List window click
 New
New  select Vendor in 1 of 2 ways:
- type into the Vendor No. field the Vendor’s Name, No, Address, or Contact, etc
-
 Browse button (or ctrl + F9)
- access full Vendor list
- or - type into Vendor No field to focus browse list
- or - use filters in the browse list (see Filters)
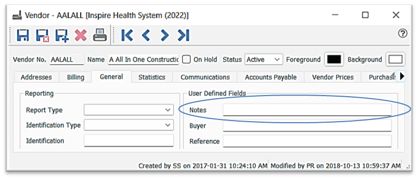
- Notes on the Purchase Order will populate from the Notes field in the Vendor record General tab:
-
- option to enter a Vendor Order No - set to enforce - Edit > User Settings > Purchase Orders > Vendor Order No Required
- option to enter a Reference No of your choice and significance
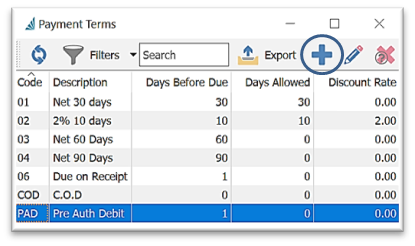
- Vendor Payment Terms - accept or change the terms setting as established in Vendor Details > General tab - or -
 Add a new one on-the-fly from the browse list for use in Orders, Vendors, or Customers (also accessible under Edit > Payment Terms) - see more in Vendor Payment Terms
- Vendor credit check - AP Balance / Credit Limit / Available Credit for the current Vendor - shaded green if your available credit covers the current order, and red if this order puts you over your Vendor's limit
- General
- option to establish a Ship To Customer from your Customer List -or- select a Ship
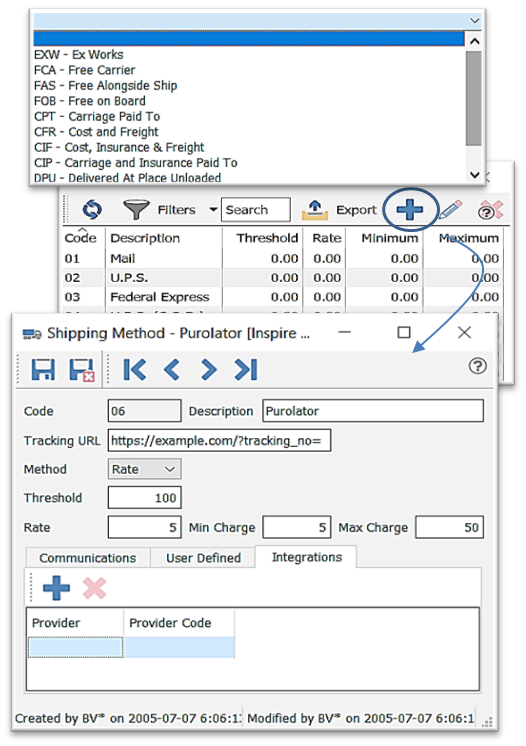 Address ID from all Ship To addresses in all Customer records
 - establish the FOB / Incoterm
- Incoterms (International Commercial Terms) activation - Edit > Company Settings > Purchase Orders - Use Incoterms
- select the Warehouse Address that this product is to be Shipped to (activate in Edit > Company Settings > Inventory >
 Multiple Warehouses and maintain in Edit > Warehouses - see Inventory Warehouses) - this will automatically insert this Warehouse into each item line
- option to establish a Ship To Customer from your Customer List -or- select a Ship
-
- Buyer - accept (as established in Vendor Details) or change for this Purchase Order
- accept / change Ship Via (as established in Vendor Details)
- see Shipping Methods
-
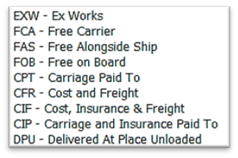
- establish the FOB / Incoterms
-
- Incoterms activation - Edit > Company Settings Purchase Orders - Use Incoterms
- Order Details
- Status - choose from the list as follows:
- Hold - whereby the Purchase Order may be created, saved and edited but may not be issued
- Open - Purchase Order is okay to issue
- Standing - sets the current Purchase Order up as a template to create, edit and issue unlimited future Purchase Orders from
- Issued - automatically assigned when the Purchase Order is printed
- Received - automatically assigned when all or a portion of the items ordered on the Purchase Order have been received
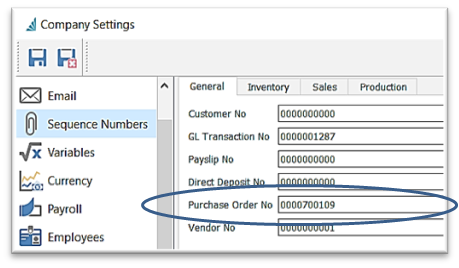 PO No is displayed, which is system-generated, unless the sequence numbering is switched off in Edit > Company Settings > Sequence Numbers - change number to all zeros to enable entering your own Purchase Order numbers
- accept or change the Order Date (defaults to today’s date)
- establish the Required Date for shipment of this order - once issued, this date will display in each Inventory item as the Due Date in the Inventory General tab, Purchasing section

- Last Received will show the date that items were last received on this Purchase Order
- Receive Date is the date the system will use for receiving currently on the Purchase Order
- Phases is a process monitoring system used to label orders internally, with option to set each Phase to automatically print a pre-determined form(s) and move to a Next Phase, as pre-determined in the Phases setup (also maintained under Edit >
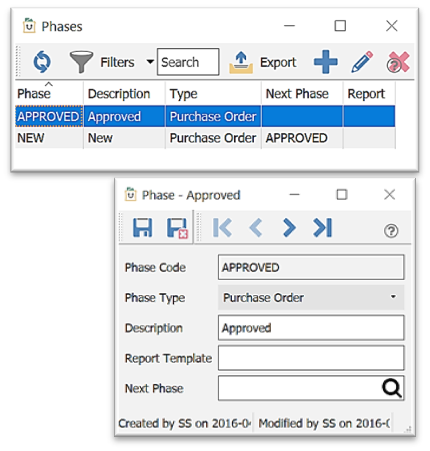 Phases), and option to set default start Phase for new Purchase Orders, by User (Edit > User Settings > Purchase Orders > Default Phase):
-
 New Phase
- enter Phase Code
- accept Purchase Order Phase Type
- enter Description
- assign the Report Template for the report to be printed once a Purchase Order has been assigned this Phase (ie: print / issue the Purchase Order once in PO Cost Confirmed Phase)
- talk to your Spire Partner about setting this up
- assign the Next Phase for use with the
 Next Phase function from the Purchases list or inside the Purchase Order
 - Phase tracking can be accessed in the Purchase Order Phases tab
-
- Status - choose from the list as follows:
-
-
 Refresh - bring in any new data that may have been entered by another user since you have had this module open or since the last time data has been refreshed
-
-
-

 Phase List Filters / Search / Customization - see ‘Purchases List Customization')
- Phases Context Menu - right-click on any line(s) in the list to display
-
 Export - export the Phases list in Excel or CSV format - see Export
 -
 Edit Phase selected.
 -
 Delete Phase selected
-
-
- Location - if the system is using multi-segment accounting (see General Ledger Segmentation), a
 user may be assigned a default segment location, which may be changed at the time of creating the Purchase Order
- click the downward arrow to change Location
- press F10 (from anywhere) to change Location and Warehouse at the same time
- Location - if the system is using multi-segment accounting (see General Ledger Segmentation), a
- Item Details
- Grid functions:
-
-
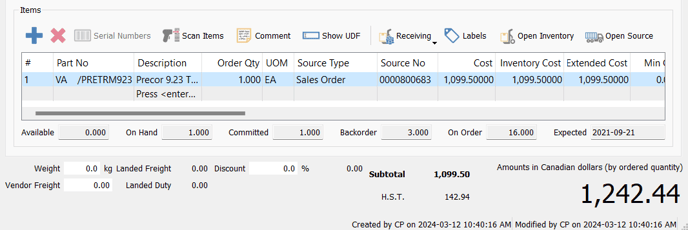
 Insert - inserts a line above the line selected to insert a Part No or Comment
 Delete - deletes the line item(s) selected
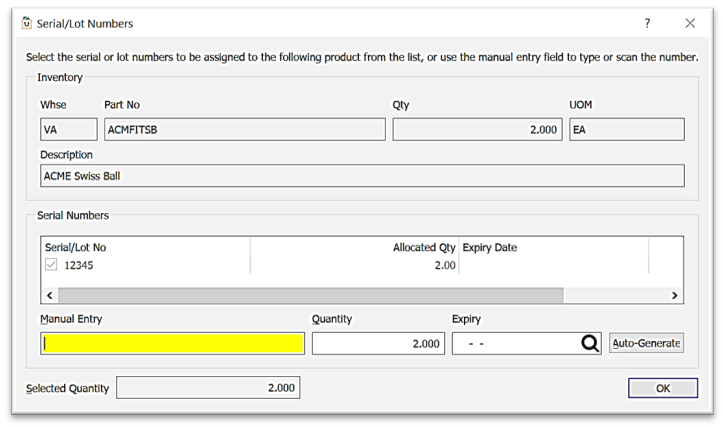
 Serial Numbers - view or re-assign serial numbers that have just been received/assigned on the selected item in the current edit session
-
- see also Inventory - Serialization and Purchase Orders - Receive Items
-
 Scan the Part / Serial / Lot Number barcode into the Purchase Order
-
-
-
 Comment - add a memo into the line selected to print on the Purchase Order
 Show UDF - view the User Defined Fields data and structure for the Purchase Order line item selected - see User Defined Fields
- data in these fields can also be made visible in the grid by right-clicking on any of the column headings for the list of available columns and putting a checkmark beside the UDF:
-


-
-
 Receive (see Purchase Orders - Receive Items)
-
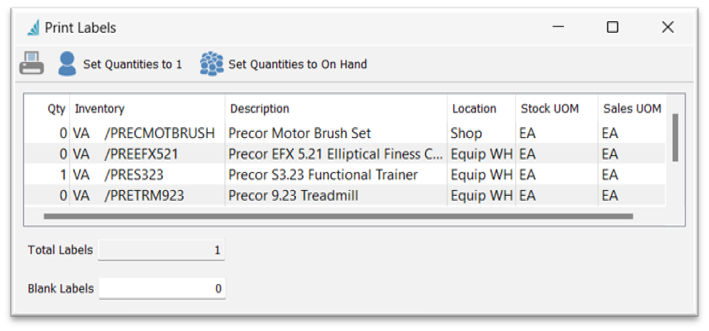
 Labels for items on the order
-
-
-
-
- set quantities - default uses Order Qty on the Purchase Order
-
 Set Quantity to 1 label for each item listed
 -
 Set Quantity to BOH (Balance On Hand)
-
- note the Total Labels
- identify how many Blank Labels to pass over before printing (for laser sheets)
- click Print
- set quantities - default uses Order Qty on the Purchase Order
-
-
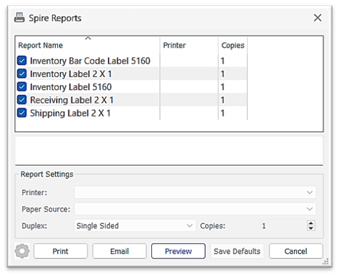
-
-
-
-
- select which Label(s) you want
-
-
 Open Inventory to access more details on the item selected
-
-
-
-
-
 Open Source will open the Sales Order from which the selected item was Requisitioned (see Purchase Order Requisitions)
-
-
-
-
- Add an Inventory Part No to the Purchase Order in one of 6 ways:
-
-
-
-
- type into the grid where auto-fill will present a list of matching items to select from
- click on the browse button to search through the Inventory list, filtered or unfiltered (see Filters)
- type characters that exist somewhere in the item details and press the F9 key to bring up a list of matching items
- click on
 Insert to insert an item above the item selected in the grid
 Scan the Part / Serial / Lot Number barcode to input Inventory item
- use * as quantity multiplier - into the scan box, enter quantity then *, then scan barcode keyboard shortcut - ctrl+space
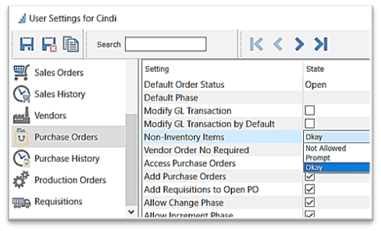
- Add a Non-Inventory item into the Purchase Order by typing anything into the Part No, settings permitting:
-
-
-
-
-
-
- User Settings
-
-
-
-
-
-
-
- Company Settings
-
-
-

-
-
- accept or change the Description
- enter the Order Qty
-
-
-
- Cost is populated from one of the following:
-
-
-
-
 Inventory Details > General tab > Current Cost which is updated each time the item is received - changing cost and then receiving will cause the Current Cost to change Inventory Details > Vendor Prices which, if present, will populate the PO
- Inventory Details > Vendor Prices which, if present, rules

-
-
-
-
-
-
- if you change the cost then receive, the Vendor Price will be updated, Vendor Price setting permitting (see Inventory - Vendor Prices)

- if you change the cost then receive, the Vendor Price will be updated, Vendor Price setting permitting (see Inventory - Vendor Prices)
-
-
-
-
-
-
-
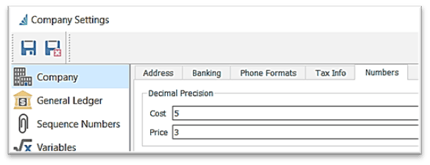
- Note that the Decimal Precision can be set in Edit > Company Settings > Company > Numbers
-
-
-
-
-
- if the item has multiple Units of Measure, you can select which UOM you want on this Purchase Order (see Inventory > Units of Measure)

- if the item has multiple Units of Measure, you can select which UOM you want on this Purchase Order (see Inventory > Units of Measure)
-
-
-
- Taxes - accept or remove checkmarks for taxes application on each line item to overwrite all other tax settings (see also Sales Taxes)
- options to enter a Discount % for the line item (alternatively, discount can be assigned to the entire Purchase Order in the footer)
- accept or change Duty / Freight for this item (option to establish defaults for these rates in Inventory details General tab, Purchasing section)
- ! Note - the Duty and Freight charges can also be established on a whole or partial Purchase Order basis (see Purchase Orders - Receive Items)
-

-
-
- option to enter Required Date for each or all line items as an alternative to the Required Date for the entire order, as entered in the header Order Details
- accept or change Vendor Part No as set up in the Vendor Price for this Inventory item (see Inventory - Vendor Prices)
-
-
-
- Inventory GL will display the General Ledger account that will capture value of the receipt of this item - use access permitting, this may be changed
- accept or change Location as setup in the Inventory details for this item - represents the location code for this item in the warehouse

- accept or change Pack Size as setup in the Inventory details for this item-this is how this item should be packed for shipping
- Sell Price 1 which represents the default selling price, may be updated here, User access permitting
- option to enter a Memo line to enter an internal message about this line item (won’t print)
- Source No / Customer will display which Sales order / Customer this Purchase Order was requisitioned from (see Requisitions From a Sales Order)
- option to assign an Employee to each line item
- option to assign a different Ship To for any or all items
- accept or change the Weight as setup in Inventory details for this item
- Extended Weight will calculate unit Weight times Qty
-
-
-
- option to assign the purchase of this item to a Job No & Job Account No (assign the entire Purchase Order in the Job tab) - see also Job Costing - Activation / Job Costing - Add New Job / Job Costing - List Functionality
-
 Save or
  Save and Close or
  Save and Create New
- view / change information in the following Purchase Order tabs:
- Bill From tab allows the option to amend Vendor address details for this Purchase Order
- Ship To tab - option to edit the information for the Ship To ID or Warehouse that was selected in the Main tab
- Sales Taxes tab - see Purchase Orders - Sales Taxes
- Communications tab - see Purchase Orders - Communications
- Receive Order tab - see Purchase Orders - Receive Items
- Purchase Receipts tab displays everything received so far on this Purchase Order
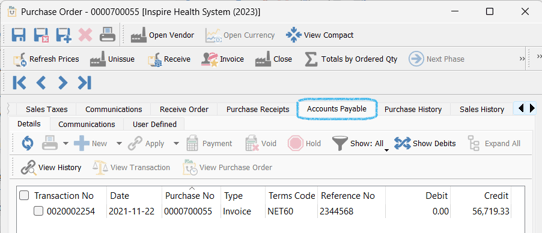
- Accounts Payable tab will display any Vendor Invoices posted to this Purchase Order
- Purchase History / Sales History tabs - see Purchase Orders - Purchase and Sales History on Items
- Phase / User Defined / Job tabs - see Purchase Orders - Phase / User Defined / Job tabs
Items Grid Column Customization - see Purchase Order List Column Customization
- for the item selected, a quick view of quantities is available below the grid

 Footer Summary
- total Order Weight displays
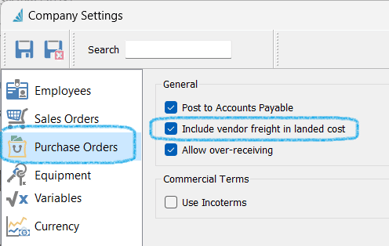
- option to enter the Total Vendor Freight that will appear on their invoice
- set to add this amount to inventory cost - Edit > Company Settings > Purchase Orders
-
- Landed Freight / Landed Duty are accessible once the Receiving function is activated - enter the amounts that apply to the entire order (see Purchase Order - Receive Items)
- Discount displays the collective line discount amounts
- Weight displays the collective weight of all items on the Purchase Order
- Subtotal displays the collective extended price for all items, before tax(es)
- Taxes will display the taxes calculated on the Subtotal, based on the setting for the entire Purchase Order (Info tab) or for each line item
- Totals display in the footer
 Totals by Ordered Quantity to display Totals for the quantities currently being received as opposed to quantities just Received
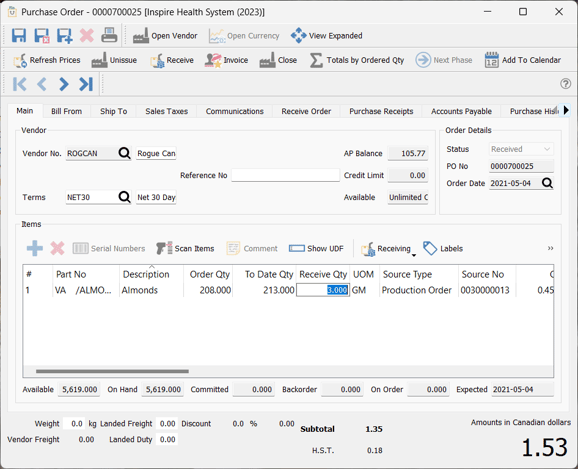
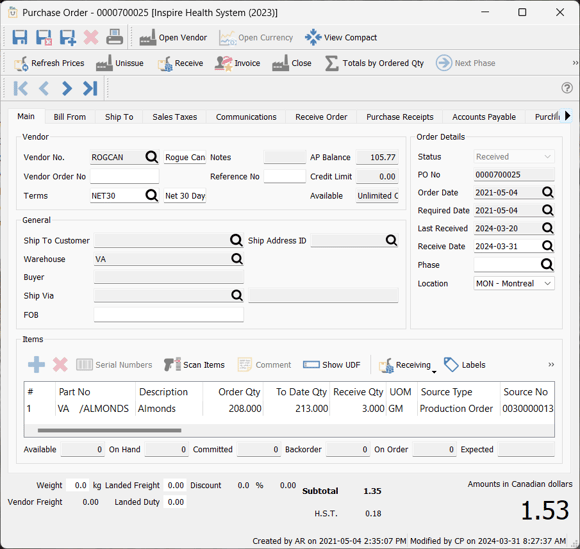
- option to View Compact / View Expanded
- View Compact shrinks header information and expands the detail grid

- View Compact shrinks header information and expands the detail grid
-
-
- View Expanded restores header and grid spacing

- View Expanded restores header and grid spacing
-
 Purchase Order Header Functions

 Open Vendor to view or edit Vendor details
 Open Currency (User settings permitting), opens the Currency setup in order to change the Exchange Rate for the valuation of the receipt
- ! note that this rate change will apply to all future transactions for this currency, not just on this PO
 View Compact / View Expanded to resize header / items sections (explained above)
-
 Refresh Prices for the Order(s) selected to load any price changes recently made to any of the items
  Issue / Unissue - see Change a Purchase Order below
 Deposit - see Purchase Order Deposits
  Receive - see Receive Purchase Order
 Invoice - see Vendor Invoice
 Close Purchase Order - once the items on the Purchase Order have been received and Vendor invoice posted (Company settings permitting), the Purchase Order can be closed by clicking on the Close icon (user access permitting)
- note that if the total of Vendor Invoices posted (refer to the Accounts Payable tab) through the PO does not match the total Received amount, a Variance will be posted to your Inventory Variance GL Account
-
 Totals by Receiving Quantity will display the Purchase Order totals in the footer for all quantities currently being received, as opposed to quantities ordered (see Footer Totals)
  Next Phase will advance the Purchase Order(s) to the next Phase based on the Phase setup (see Phases page 6)
 Add to Calendar
- create a new Communication alert / note to appear on your calendar (see Purchase Order Communications)
 Navigation arrows will page through the Purchase Orders in the list in order of the current column sort
 Change a Purchase Order
- Issued but un-Received PO - click
 Unissue and make any changes
 - Issued and Received PO - click
 Unissue Purchase Order to make changes to Part Description / Order Qty / add item(s) / or change PO header information (also accessible inside the PO)
- note…you can Unissue a Received PO but Unissue does not allow access to the Cost field
- change the cost on a Received Part (no need to Unissue)
- negative-receive what has been received so far for that Part

- click Receive at the top of the PO
- open the PO again to see the To Date Qty is now zero, and the Cost is now accessible
- note that if there have been Sales Orders posted, they will have depleted the Inventory and posted the wrong Cost of Goods Sold amount
- negative-receive what has been received so far for that Part
 Receive - see Receiving
 Invoice - see AP Invoice from a Purchase Order
.png?height=120&name=Gemini-Logic-Logo%20(1).png)
