How to add a new Sales Order Manually

See also Add a Sales Order using Copy and Add Sales Orders using Import
- select from 1 of 3 locations to add a new Sales Order:
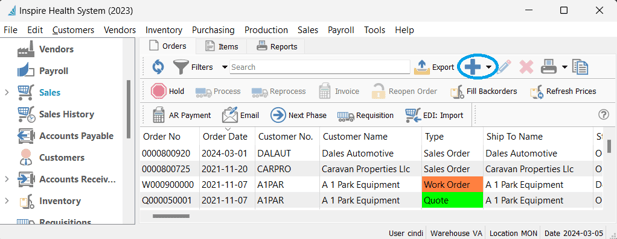
- from the Sales Order list click
 New or click the downward arrow beside it to assign the order Type
- from the Sales Order list click
-
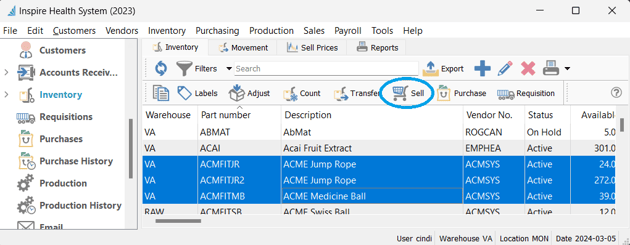
- from the Inventory list click
 Sell for the selected item(s)
- from the Inventory list click
-
- from Customer Details select
 Create Order
- from Customer Details select

- in the new Sales Order, select Customer in one of 2 ways:
- Customer No. field, to be used in the following ways:
- information typed into this field will search through entire Customer record ie: Name, No, address, contact, notes, etc and present a drop-down list of 10 closest matches
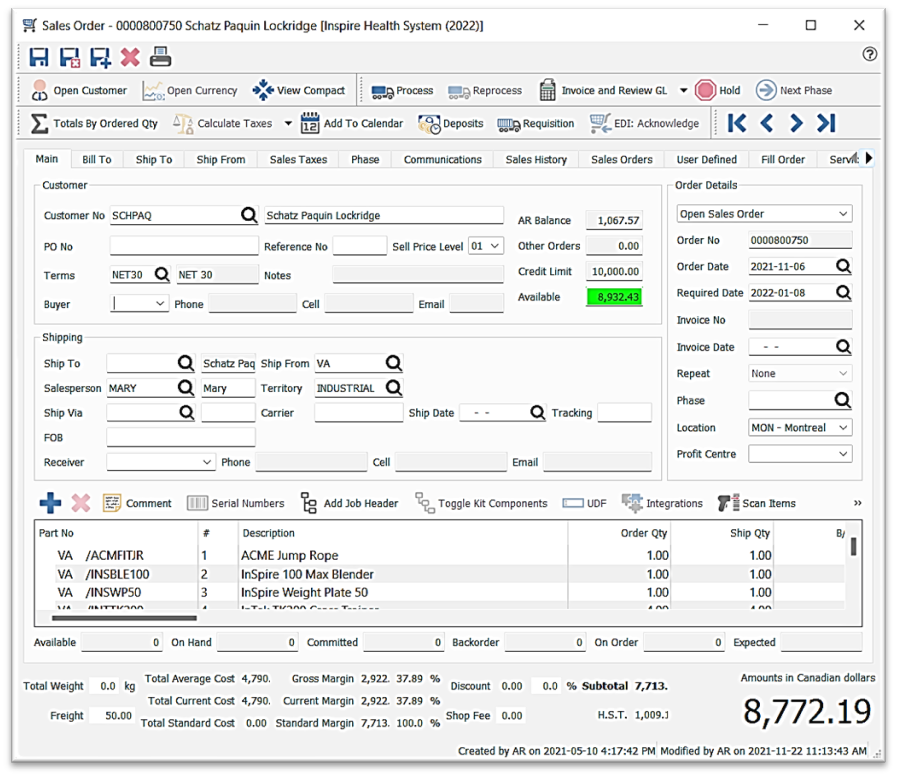
- information typed into this field will search through entire Customer record ie: Name, No, address, contact, notes, etc and present a drop-down list of 10 closest matches
- Customer No. field, to be used in the following ways:
-
-
- Browse button (or ctrl + F9) to access full Customer list
- type into the Customer No field then click the
 Browse button (or ctrl + F9) to narrow the browse list based on what you've typed
  Browse button (or ctrl + F9) then use filters in browse list (see Filters)
 Browse button (or ctrl + F9) then
  New to create a new Customer (see Customers - Add New)
- enter the Customer’s Ship To which will load the Bill To automatically
-
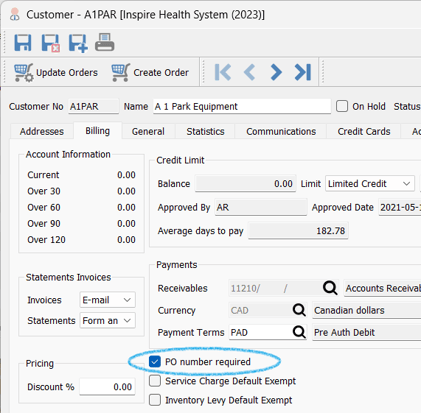
- option to enter the Customer’s PO No which can be forced if established in the Customer Details > Billing tab
-
- in which case the Sales Order cannot be saved unless the Customer’s PO Number is present and changes the PO No field in the Sales Order header:

- Option to warn when a duplicate Customer POs has been entered into a Sales Order:

- in which case the Sales Order cannot be saved unless the Customer’s PO Number is present and changes the PO No field in the Sales Order header:
- option to enter a Reference No which is not linked to anything but could be a Job Number for example, and which can be printed on forms or reports
- Sell Price Level - accept or change (user settings permitting) to apply all items on the Order (ability to change for each line item also)
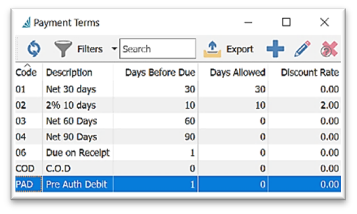
- Customer Payment Terms - accept or change the terms setting as established in Customer Details > General tab
- or- add
 New one on-the-fly from the browse list for use in this and future Customers and Sales Orders (also accessed in Edit > Payment Terms) - see more in Customer Payment Terms
 - option to activate alerts and/or security in Edit > Company Settings > Sales Orders > Process/Invoicing tab > Customer Credit section:
- or- add
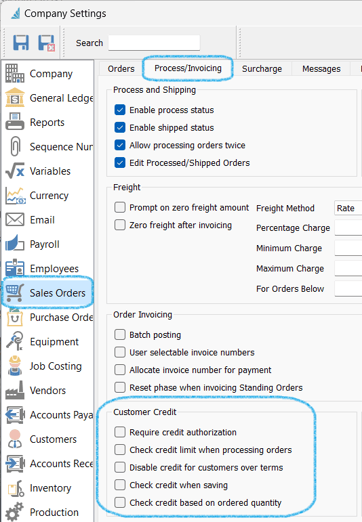
- convenient view of AR Balance (hover your mouse cursor over this amount to see Aging) / Other Orders / Credit Limit / Available Credit for the current Customer - shaded green if their available credit covers the current order, and red if this order puts them over their limit
- select the Buyer from a drop-down list of Customer Contacts or enter one ad-hoc which will print on Sales forms, but which will not be added to the Customer Details record (set Buyer default in Edit > Company Settings > Sales Orders > Orders – Default Buyer Contact Type
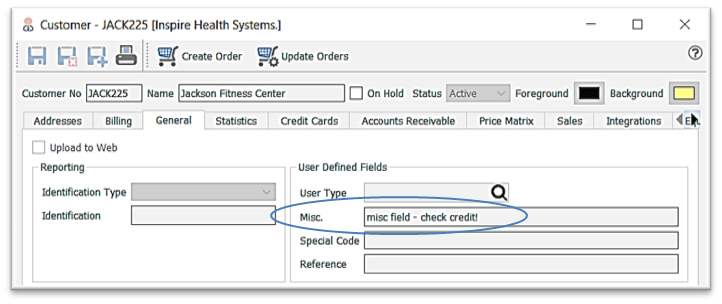
- Notes field displays information entered into the Customer record ‘Misc’ field
- Shipping
-
- accept or browse for the Ship To and select from the Customer’s list of Ship To addresses
-
-
- or - switch the view to
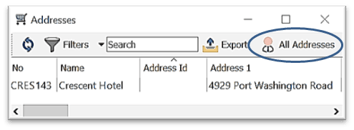
 All Addresses to choose from your entire Customer List
- or - switch the view to
- accept or change the Salesperson / Territory that load from the Customer Details > Addresses tab > Order Defaults sub tab - also accessed in Sales text menu

- accept or change the Ship Via as established in Customer Details > Addresses tab > Order Defaults sub-tab > Shipping Method (see Shipping Methods for more information)
-
-
-
-
- enter Carrier Name (Shipping Company)
-
-
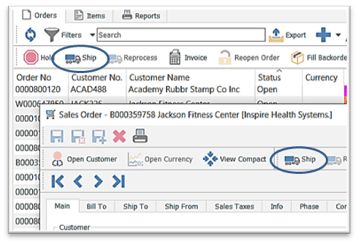
- Ship Date - auto-filled when the ‘Ship’ button is depressed in the Sales Order or Sales Orders list
-
- enter Tracking No (will create a hyperlink if Tracking URL is established in the Shipping Method settings)
-
- accept or change the FOB/ Incoterm
- Incoterms (International Commercial Terms) activation - see Company Settings - Sales Orders Incoterms
- accept or change the FOB/ Incoterm
- Receiver - option to select a Contact from the Customer Details list of contacts, or add one ad-hoc which will print on Sales forms, but which will not be added to the Customer Details record - set default in Edit > Company Settings > Sales Orders > Orders – Default Receiver Contact
- Order Details
- Type
- to set the current Sales Order Type, choose from the list as follows:

- Open Sales Order- Sales Order that’s okay to ship and invoice
- Open Quote where product does not get committed until status is changed to Open Sales Orderoption to set Expires date (set default number of days in Edit > Company Settings > Sales Orders > Orders tab - Quote Expiry 👉
- Open Booking Order to schedule a future order, where product does not get committed or backordered
- Open Standing Order - sets the current Sales Order up as a template to create, edit and issue unlimited future Sales Orders from and optionally establish Repeat settings (see Recurring Invoices)
- Open RMA Order has no different function except that it can be numbered and / or coloured differently
- Open Work Order has no different function except that it can be numbered and / or coloured differently
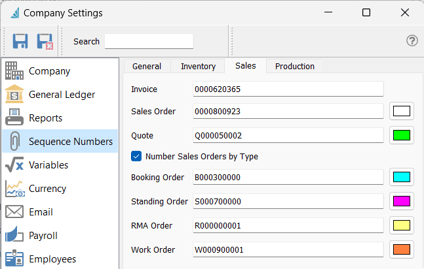
- option to identify each Type by colour - Edit > Company Settings > Sequence Numbers > Sales tab
- to set the current Sales Order Type, choose from the list as follows:
- Type
-
-
- option to
 Number Sales Orders by Type
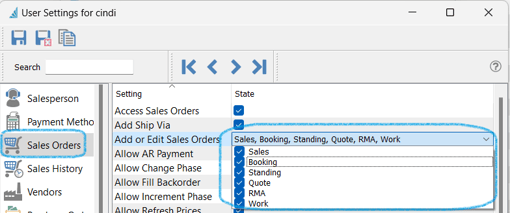
 - Type Access and Default can be set by user
- option to
-
-
-
- Order No is displayed which is system-generated unless the sequence numbering is switched off in Company Settings > Sequence Numbers - change numbers to all zeros to enable entering your own Sales Order numbers - here you also have the ability to change the background colour in Sales Order browse lists
-
-
-
- accept or change the Order Date (defaults to today’s date)
- establish the Required Date for shipment of this order
- set a default to auto-fill this date in Edit > Company Settings > Orders > Required Date
- Invoice No / Invoice Date are populated once order is invoiced, for look-up purposes
- Repeat cycle is used for Recurring Standing orders (see Recurring Invoices)
- Phases is a process monitoring system used to label orders internally, for filtering and sorting purposes, with option to set each Phase to automatically print a pre-determined Report(s) and move to a Next Phase, as pre-determined in the Phases setup (also maintained under Edit > Phases), and option to set default start Phase for new Sale Orders, by User (Edit > User Settings > Sales Orders > Default Phase)

 Refresh - bring in any new data that may have been entered by another user since the last time data was refreshed and which may not be displayed
 Phases List Filters / Search / Customization - see Sales Orders - List Access / Functionality
-
 New Phase
- enter Phase Code
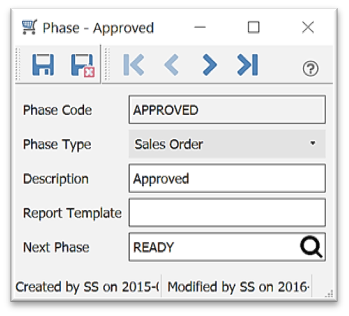
- accept Sales Order Phase Type
- enter Description
- assign the Report Template for the report to be printed once a Sales Order has been assigned this Phase (ie: print the packing slip once the order is ready to ship) - talk to your Partner about setting this setup
- assign what will be the Next Phase when using the Next Phase function from the Sales Order list
- enter Phase Code
-
-
-
-
-
 export the Phases list in Excel or CSV format - see Export
-
-
-
-
-
-
-
 Edit Phase selected
 Delete Phase selected
 - Phases Context Menu - right-clicking on any line to display
- Phase tracking can be accessed in the Sales Order Phases tab
- GL Division - if active, accept or change (user settings permitting for Edit Profit Center) the GL Division for this Sales Order as established in Customer Details > Addresses tab > Order Defaults tab (see General Ledger - Divisions)
- Location / Profit Center - if the system is using multi-segment accounting
 (see General Ledger Segmentation), a user may be assigned a default segment Location / Profit Center , which may be changed at the time of creating the Sales Order
- click the downward arrow to select
- Location / Profit Center - if the system is using multi-segment accounting
 (see General Ledger Segmentation), a user may be assigned a default segment Location / Profit Center , which may be changed at the time of creating the Sales Order
- click the downward arrow to select or press F10 from anywhere to change Location and /or Warehouse
-
-
- Items
- Grid functions:

 Insert - inserts a line above the one selected to enter a Part No or Comment into
 Delete - deletes the line item selected
 Comment - add a memo to print on the Sales Order below the item selected (also available if you hit the Enter key when the blank grid line is selected)
 Serial Numbers
 select Serial/Lot no from list for item selected in the Items grid
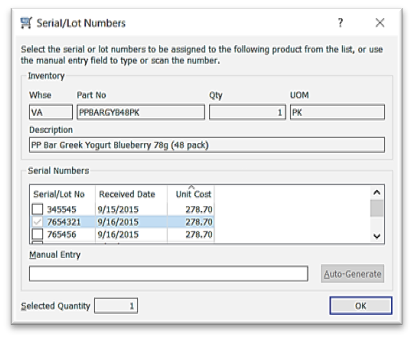
- if Serial/Lot Numbers are being created as you sell (as in manufactured / assembled items) with option for Manual Entry or Auto-Generate the numbers where you can type in the fist, and it will auto-assign for the remaining quantity in sequential order
 Add Job Header opens the line above to enter a title for the items that follow, creating a Group
- also allows ability to
 Delete entire group
 - if Job Costing is active and a Job Account is assigned to the Job Header, the same Job Account is automatically assigned to any members added to this ‘Group’
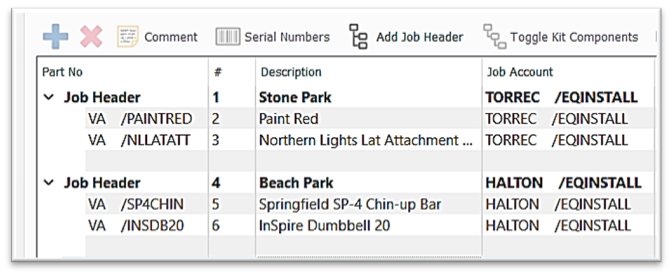
- ability to customize Sales reports and forms with sub-totals for these ‘Groups’
- also allows ability to
 Toggle Kit Components to display / print
- activate - Show options dialog on orders in the components tab (see Inventory Kits)
 UDF - view the User Defined Fields data and structure for the Sales Order line selected (see User Defined Fields)
- data in these fields can also be made visible in the items grid by right-clicking on any of the column headings for the list of available columns and putting a checkmark beside the UDF:
- Grid functions:
-


-
-
-
 Scan the Part / Serial / Lot Number barcode to input Inventory item
- use * as quantity multiplier - into the scan box, enter quantity then *, then scan barcode
- keyboard shortcut - ctrl+space
 Fill move B/O Qty into Ship Qty for items that have come into stock since the Sale Order was created
-
-
-
-
-
-
- All Backordered items on the Sales Order

- Backorders only on Selected Item(s)
- Serial/Lot number on selected item
- Backorder numbering may be identified with a numeric suffix if established in Edit > Company Settings > Sales Orders > Process/Invoicing tab > Backorders > Use suffix on order number to manage backorders - ie: 100270-0, 100270-1, 100270-2, etc)
- All Backordered items on the Sales Order
-
-
-
-
-
-
-
 Prices options:
-
 Refresh All Prices to populate all items on this Sales Order with price changes that have been made since the Sales Order was created
  Refresh Selected Prices to populate only selected items on this Sales Order with price changes that have been made since the Sales Order was created
-
-
-
-
-
-
-
-
-
 Store Selected Price to create Price Matrix entries for the item(s) selected and the Customer in this Sales Order (see more in Price Matrix)
 -
 Store All Prices to create Price Matrix entries for all items and the Customer in this Sales Order (see more in Price Matrix)
- Store options:
-
 Create records for regular prices - store in Customer Price Matrix even if the price was not changed
 -
 Apply to all Warehouses / Restrict records to shipping address
-
- Store options:
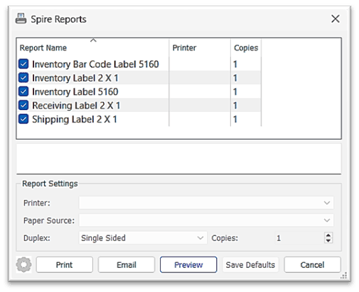
 Labels for items on the order
- set quantity
- default uses Qty shipped on the Sales Order
-
 Set Quantity to 1 label for each item listed
  Set Quantity to BOH (Balance On Hand)
- note the Total Labels
- identify how many Blank Labels to pass over before printing
- click
 Print
Print - select from available Label layouts
- set quantity
-
-
-
-
-
-
-
-
 Show Stock will display the Inventory Stock listing availability in all Warehouses it is stocked in
  Open Inventory to view or edit the item selected
 Open Target to view the Requisition target Purchase Order or Production Order for the item selected, which displays in the ‘Target Type’ and ‘Target No’ columns (see more on Requisitions)
- Add an Inventory Part No to your Sales Order in one of 7 ways:
- type into the grid under Part No to get a list of 10 closest matches of Part No, Description or Product Code (hit F9 to see entire inventory list)
- type the Customer Part No (for setup, see Customer Part Numbers)
- Customer Part No will populate the Sales Order line

- if you want the Customer Part No to populate even if you enter your Part No, enable Resolve Customer Part No in Edit > Company Settings > Sales Orders > Inventory
- Customer Part No will populate the Sales Order line
- click on the browse button to search through the Inventory list
- click on
 Insert to insert an item above the item selected in the grid
  Scan the Part / Serial / Lot Number barcode to input Inventory item
- use * as quantity multiplier (as identified in Company Settings) - into the scan box, enter quantity then *,
 then scan barcode
 - keyboard shortcut - ctrl + space
- use * as quantity multiplier (as identified in Company Settings) - into the scan box, enter quantity then *,
- type in a Non-Inventory Part Number (User Settings permitting) with ability to establish a default Inventory GL Account in Edit > Company Settings > Special Accounts tab > Inventory - Non-Inventory
- accept or change the Description (User Settings permitting)
-
-
-
-
-
-
- Quantities
-
- enter the Order Quantity (or if scanning, keep scanning until quantity is reached)
- system will default the Ship Quantity to Order Quantity or what is left in stock but this value can be changed (if permitting - Company Settings > Inventory -
 Prohibit over shipping)
- if entering a serialized item or lot item, you will be prompted to assign a serial / lot number(s) for the Committed Quantity on this order
-
- system will default the B/O (backorder) Quantity to the difference between Order Qty and Ship Qty (quantity in stock)
- Quantities
-
-
-
-
- enter Discount for line item(s) or discount for full order in the footer
-

-
-
- Unit Price is populated from one of the following:
-
-
-
-
- Inventory Details > Prices and Units > Pricing > Level 01 (option to choose another Price Level)
- Price Matrix in Customer or Inventory Details (see Price Matrix)
- manually enter price (user settings permitting)

-
-
-
-
-
-
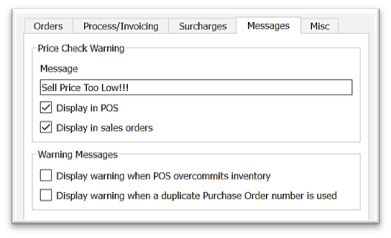
- Note - if a selling price is entered where the margin turns out to be lower than what is established in the related Product Code or Price Matrix setting, there will be two flags:
- in the Unit Price field - a message will pop up when you hover your mouse over the

- in the Unit Price field - a message will pop up when you hover your mouse over the
- Note - if a selling price is entered where the margin turns out to be lower than what is established in the related Product Code or Price Matrix setting, there will be two flags:
-
-
-
-
-
-
-
-
-
- setup this message in Edit > Company Settings > Sales Orders > Messages tab > Price Check Warning - Message
- the Average % (Margin on the Average Cost) will turn red
-
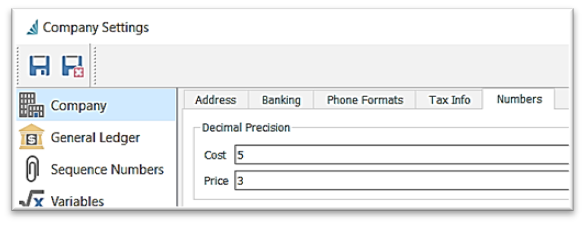
- set Decimal Precision in Edit > Company Settings > Company > Numbers
-
- Current Cost (only viewable / editable if user settings permit) is what this item was most recently purchased for
- if a User edits this field, it will turn yellow
- Average Cost (only viewable / editable if user settings permit) is the weighted cost of what is currently in stock
- if a User edits this field, it will turn yellow
- if the item has multiple Units of Measure, you can select which UOM you want on this Sales Order (see Inventory - Units of Measure )
- accept or remove checkmarks for Taxes application which populate from Customer Details > Addresses > Taxes (you may change taxes on the entire Sales Order in the Sales Taxes tab)
- see also Sales Taxes set up
-
-
-
-
-
-
-
- Set Customer taxes: Customer Details > Addresses > Sales Taxes

- multi-edit Customer Billing / Ship To taxes: Customer text menu > Customer Addresses >
 Update Tax Codes for all Addresses selected
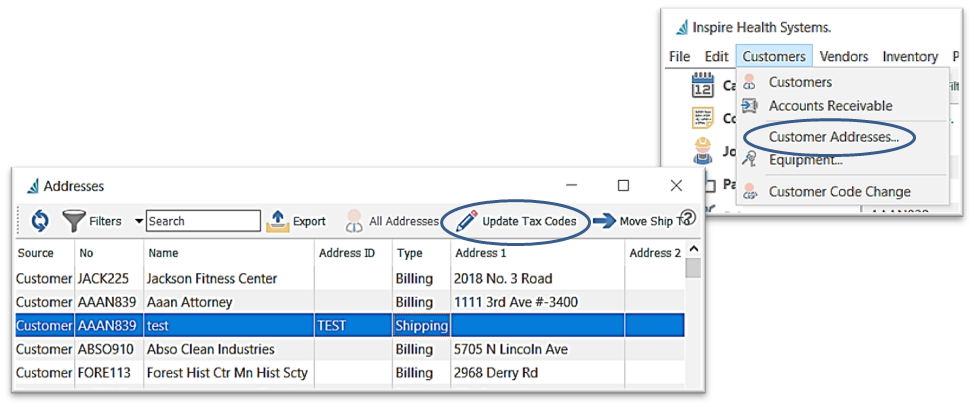
- Set Customer taxes: Customer Details > Addresses > Sales Taxes
- enter or accept Vendor No as set up in Inventory Details > General tab > Primary Vendor - this is used for Requisitions that are initiated by Sales Order shortages (see Inventory - Requisitions )
-
-
-
-
-
-
- accept or change Levy as established in Inventory Details > Prices and Units > Levy Code ie: environmental charge / disposal fee (see Inventory - Prices and Units Tab)
- system will calculate Extended Price / Extended Levy / Margin (%) on Current Cost / Margin (%) on Average Cost / Margin (%) on Standard Cost (if Standard Cost is present on item)
- option to assign an Employee to this line entry in the Sales Order for commission / labour tracking purposes
- once saved, the system displays the User Initials this Order was Created By and Modified By
- system will display item Location in the warehouse, as established in Inventory > Prices and Units > Unit of Measure > Location
- system will display item Pack
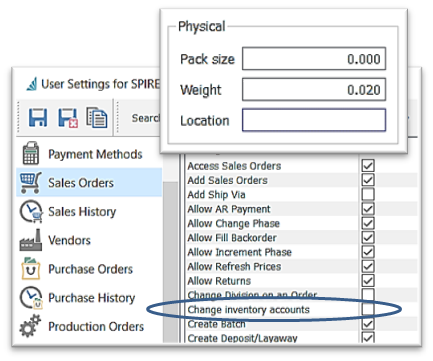 Size, as established in Inventory > General tab > Physical > Pack Size - represents how this item should be packed for shipping
 - option to enter an internal Memo for this line item…not linked with anything and will not print on any forms or reports by default
- accept or change Inventory GL / Cost of Goods GL / Revenue GL - provided the user has setting for
 Change Inventory Accounts
 - option to enter a Reference No of your choice for this line item
- accept or change (user settings permitting) unit Weight, as established in Inventory Details > General tab > Physical > Weight - zeros will display in red / or enter Total Weight

- track total weight for the order (displays red if one or more items shows zero weight)
- set Weight Units in Edit > Company Settings > Inventory - Weight Units
-
- Extended Weight displays the unit Weight times the Ship Qty
- UPC - establish in Inventory Details > Prices and Units tab > Unit of Measure > UPC Code
- Job No & Job Account No assignment option for the revenue of this sale (see also Add Job Header)
- Target Type and Target No pertain to any Requisitions that were created by this sales order, determining whether the Requisition was for a Purchase Order or a Production Order (see Inventory Requisitions)
- accept or change Freight amount in the footer
-

-
-
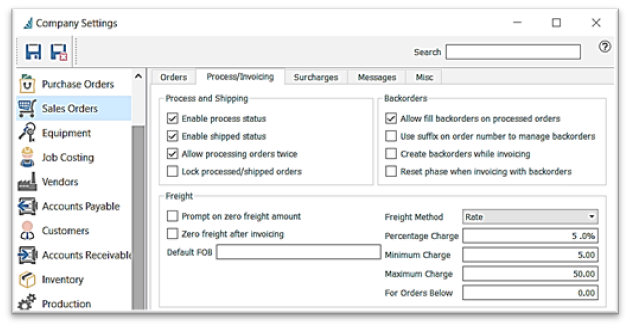
- establish settings in Company Settings > Sales Orders > Process/Invoicing tab > Freight
- Item Quantity Information
- for the item selected, a quick view of quantities is displayed below the grid
-

-
-
 Save or
  Save and Close or
  Save and Create New
-
- Order Summary
- Total Weight displays the collective weight of all items on the Sales Order (unless it is manually edited) - will display red if there are any items with no weight value present
- Freight - accept or change Freight amount in the footer - conventions are established in Company Settings > Sales Orders > Process/Invoicing tab > Freight
- Discount allows entry of discount percentage to be applied to the entire Order (see also Line Discounts)
- optional Surcharge - ie: Shop Fee
- setup a Sales Order Surcharge in Edit > Company Settings > Sales Orders > Surcharges with option to establish the Alias

- Sales Tax Provider Code
 can be assigned if Avatax is active for US Sales taxes
- Sales Tax Provider Code
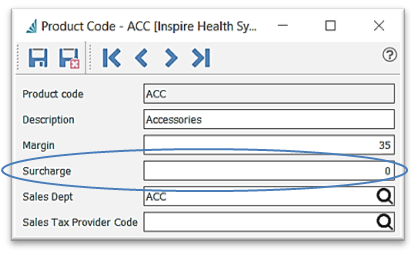
- setup a Surcharge by Product Code in Edit > Product Codes to add the charge to Sales Orders for only items in this Product Code
- setup a Sales Order Surcharge in Edit > Company Settings > Sales Orders > Surcharges with option to establish the Alias
-
- system displays Gross Profit on Current Cost (Current GP) / Gross Profit on Average Cost/Gross Profit on Standard Cost
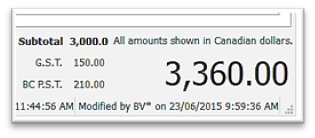
- Subtotal displays the collective extended price for all items, before tax(es)
- Taxes will display the taxes calculated on the Subtotal, based on the setting for the entire Sales Order (Info tab) in conjunction with any settings for each line item
- Totals display in the footer

-
-
- click
 Totals by Ordered Quantity to display totals for items ordered as opposed to items shipped
- click
-
- Bill To tab allows the option to amend (user settings permitting) or add any Customer address or Contact details for this Sales Order
- Ship To tab - option to edit or add Address or Contact information for the Ship To ID that was selected in the Main tab
- Ship From tab will display the address of the Warehouse established for the User unless a different Warehouse has been set for the Customer - option to edit or add Contacts
- Sales Taxes tab - accept or change the tax settings as established in Customer Details > Addresses > Sales Taxes tab (see Sales Taxes setup)
-
-
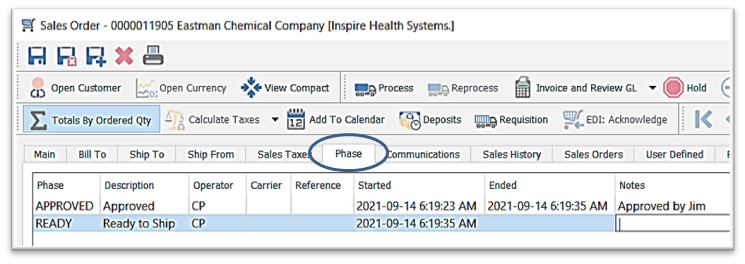
- Phase tab displays information on transition between Phases that have been established for this Sales Order (see Phases)
- Communications tab - see Sales Orders - Communications
- Sales History tab - see Sales History
- Sales Orders tab displays all open Sales Orders for the Customer on the current Sales Order, offering two view tabs - Header / Detail for full functionality to add / edit / delete and otherwise manage Sales Orders, as explained in this section

- User Defined tab allows addition of custom fields for use in filters, searches, forms and reports - see User Defined Fields

- Fill Order tab - for use with a scanner to populate quantities into Ship Qty field
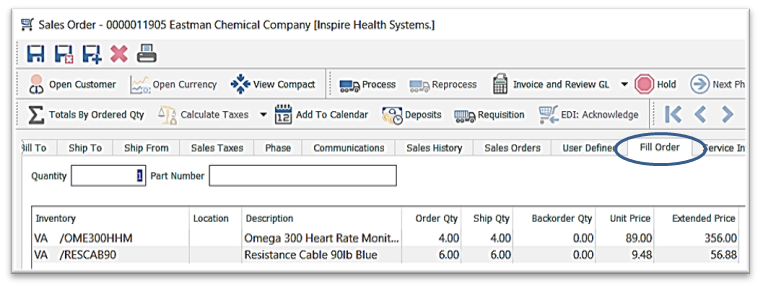
- enter Quantity
- scan the part number barcode to complete quantities -or- scan the serial number barcode to enter both part and serial number at the same time
- Service Info tab - visible if you have purchased and activated the Service Manager module - see more info in Service Manager
- Integrations tab will display other software integrations available directly in Spire like SPS Commerce (see EDI for more information) or Avalara Tax management (US) – see also Integrations
- Job tab - if active, allocate revenue / expense for the entire order (see Job Costing)

 Invoice the Sales Order to print an invoice for the selected Sales Order(s) and post the transaction to the Customer’s account in Accounts Receivable, Sales History, and post the General Ledger transaction - see SALES ORDERS - Post Invoices
.png?height=120&name=Gemini-Logic-Logo%20(1).png)